Creative Solutions For Inspired Learning
MenuCreative Solutions For Inspired Learning
MenuBy Professor Loudon Stearns
Since its introduction, the Roland GAIA SH-01 has become an international platform for teaching not only synthesizer programming, but sound design, mixing, signal flow, and music production as well. Its simple design and intuitive control panel provide teachers with a powerful visual and tactile environment to convey basic and complex concepts, while allowing students to learn with greater speed and comprehension. Loudon Stearns is associate professor at Berklee College of Music and also teaches extension courses through Berklee Online. He has developed a number of teaching methods and free video resources utilizing the GAIA and its companion sound designer software to empower teachers and students alike.
The Best Approach
I have been teaching synthesis at Berklee for six years, and I have presented the basics of synthesis in various ways such as oscillator, filter, amplifier, LFO, and envelope. I’ve come to this conclusion along the way: synthesis must be done to be understood. When presenting the material in an abstract, like a PDF or text handout, students just don’t retain the information and can’t use the information well. The learning results are so much better when the students actually get on the synth, where they can hear and see the impact of the parameters. As part of the online course, I create videos and have the students work with soft synths, which can work quite well for the dedicated student, but I think the absolute best approach is when students use a hardware synth with a nice compliment of knobs and faders. Enter the GAIA SH-01 Synthesizer.
Feel It and See It
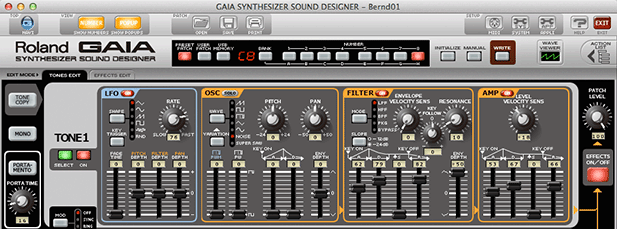
If a student can touch the device, and have that tactile sense while they are manipulating the sound, the information is absorbed quickly, and they have fun doing it. The other element that really helps retention of this material is visual feedback and confirmation of what the student is hearing. With the SH-01, Roland did an amazing job at creating a synth to teach with. It has very well-labeled controls, and just the right amount of power. Also, the SD-SH01 Sound Designer is a great piece of companion software to visually show results of the sonic manipulations.
In addition to helping students, I wanted to show teachers how the GAIA serves as a great instructional platform. To do so, I created a series of free videos that outline my approach to teaching synthesis with the GAIA. The goal here wasn’t to show everything the synth does (though we certainly cover much of what it does). Instead, it shows a process, a way of moving through the synth that creates usable and interesting patches along the way. By presenting the material in this way, and breaking often to allow the students to play and explore, the student retains the information quite well and learns how to create a variety of interesting patches completely from a blank patch.
Start Together
The first video is an introduction and covers basic setup with the first lesson focusing on how to initialize the synth, i.e. get it to a really simple starting point where there is no difference between the teacher and student experience. It is really important for the students and teacher to have the same programming starting point in order to really dive into synthesis.
While initializing the synth, the audio signal flow can be discussed, from the sound creator (oscillator), to the sound shaper (filter), and to the dynamics control (amplifier). This is a good place to point out how the colors outlining the front panel are used to differentiate between the audio sound path (yellow) and the modulation (blue). Once the students have configured the synth to match the teacher, the first patches can be created.
The Amplifier
My series approaches synthesis starting with the amplifier envelope and works back to the oscillator. I like to talk about the amp envelope first, as it is often the most important thing to understand when trying to adapt a great preset to your own track. It can also be the trickiest bit of the synthesizer, so covering it first when the students are really focused is usually best. Oftentimes students will have some experience with synthesis already but not fully understand what is going on. They will realize that the ADSR amplitude envelope is important but will generally think that sustain is an amount of time, like it is in their usual life, i.e. “This guitar has great sustain!” But, in “synth-land,” sustain is a LEVEL. To get past this initial and common error, I start by showing the sustain fader as a performance tool to manually control level. At this point, the GAIA software becomes really helpful. The envelope view is perfect for showing graphically the impact of the amplitude envelope. Once sustain is understood, I like to create some synthesizer envelope settings that mimic various acoustic instruments, pausing often to allow the student to perform with each parameter that is introduced.
The Filter
After working with the amplifier, we move back through the sound path to the filter section. The main challenge with this section of synthesis, like sustain, is a linguistic one. Pass filters are very important in synthesis, but students often get the terminology wrong. So, when introducing filters, it is very important to emphasize the “pass” in “pass filters.” A low pass filter allows the lows to pass through. A high pass filter allows the highs to pass through. I try to avoid talking about “cutting” frequencies and instead always refer to frequencies as “passing through” the filter.
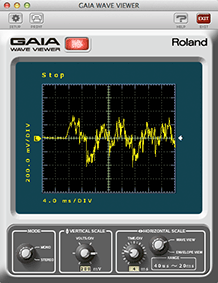
As we introduce filters, I find it useful to really focus on the low pass filter and manipulating the filter cutoff, because it is extremely important, very “playable,” and so fun. When exploring filters, it is also great to introduce the GAIA Wave Viewer in waveform mode so students can associate waveform with timbre.
When filters are understood, we already have a great compliment of parameters to play and create music. If we go too far with the synth right away, students can become overwhelmed with the options, so this is a good point to show something fun and give them time to explore. I like to introduce “key hold” and the arpeggiator at this stage so I can play some low notes, turn on key hold, turn the arp on, and perform with filter sweeps and envelope parameters. Students love this because there is a great collection of arpeggiation patterns to explore in the GAIA. With a good arpeggiator pattern and filter sweeps on top of the pattern, many students really start to get it. And when they do, let them play!
The Filter Envelope
Like amp envelopes, filter envelope can imitate the way timbre changes in most acoustic instruments: bright attack that dulls as the note decays. This is a good point to bring up the terms “VCA” voltage controlled amplifier, and “VCF” voltage controlled filter. And, students can take what they learned with the amp envelope and with the filter settings and combine the two ideas. See how this is all coming together?
With modulation, I find it best to create the “goal” sound manually first by working with the physical controls on the synth. For example, play a note and control filter cutoff with a knob. While performing it manually, we think of the starting point, ending point, and speed of the movement. Once the timbre can be performed manually, we enlist the help of a built in modulator, (the envelope) to help create the modulation on every note.
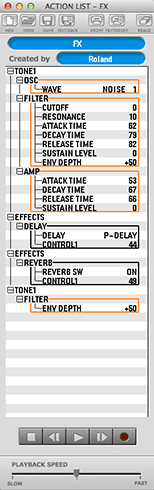
Another great way to illustrate the steps taken to create a new sound is the Action List in the GAIA Sound Designer software. As you adjust each knob, button, and fader on the GAIA, it can be recorded and displayed for the whole class. This is a fast and effective way to keep students on track, and you can save the list to use in other classes, homework assignments, and even tests. It’s the ultimate, “show your work” tool in a lab environment so you can see how each student is doing.
From here I describe a process for setting filter modulation, always relating back to the previous amplitude envelope concepts. And of course give the students plenty of time to play!
If the class is advanced and moving along well, this is a great time to explain inverse modulation in the filter envelope to create a sound I call “pluck and swell.” This is complex but is a great way to show how a synthesizer setting can change the way you perform with the instrument.
The Oscillator
Next, we move on to the Oscillator section. At this point, we start comparing the various synth waveforms, and it is really important to have the GAIA Wave Viewer on screen and set to waveform mode so the student can relate timber and waveform. Re-introducing filters here is great way to reinforce what was learned earlier.
Built into the oscillator section is an AD envelope. A great lesson to introduce this feature is to create a solid 808-style kick drum. I recommend connecting some powerful speakers to hear it well. Take this opportunity to create a variety of sound effects, like early video game sounds, which is fun for most classes.
The oscillator section and working with pitch variations over time is a great point to introduce monophonic mode and portamento. Again, we relate this back to acoustic instruments.
The LFO
The final section is the LFO, low frequency oscillator. This is different than the previous sections in that it is not part of the sound path; instead, it is solely a modulation source. This difference is shown on the synth as a different color.
When introducing the LFO, I like to start with vibrato and again relate the settings to acoustic instruments. We find that slight amounts of modulation can have a huge impact on the final sound. The first example of “secondary modulation,” an envelope modulating the depth of an LFO that is modulating pitch, can be built into this section as well. This kind of series of modulation is really a beautiful aspect of synthesis, and as students begin to understand secondary modulation, the richness of synthesis opens up for them. They start really understanding that all synthesizers are collections of connected modules, each of which is fairly simple.
For the advanced class, this is a good time to bring in “retrigger,” and using it to create a deep tremolo. On the GAIA, hold the SHIFT button and press the LFO’s “Tempo Sync” button to switch between a “free running” and “retriggered” LFO.
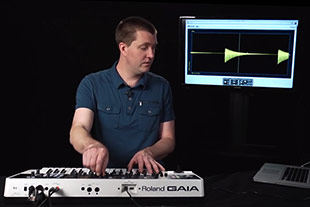
Hopefully this has given you a process to go through with your students and some good approaches to teaching synthesis. Please watch the videos to see the button pushes and fader moves and to hear the resulting audio examples. Much like learning synthesis on the GAIA, they will help illustrate the techniques so you can easily incorporate them into your lessons and productions. If you have any questions, please feel free to contact me at lstearns@berklee.edu.
If you’re eager to hone your synthesis and music production skills, check out Berklee Online’s Composing and Producing Electronic Music 1 and Recording and Producing in the Home Studio. You can visit online.berklee.edu to learn more about pursuing your music education online and sample one of their online courses.